Secure static websites on AWS with Terraform & GitHub Actions
It was time to rehaul my blog - Gatsby, Netlify and the mess of moving between them made me want to handle my own infrastructure. I also sucked at React and JS, so I decided to start afresh.
My goal was to do, from scratch, the things I wanted to learn, and use templates for the rest, so I created a static website using Zola and a theme I found from their showcase.
This blog covers the messier part - setting up the infrastructure needed to host that blog on the web - using AWS, Terraform & GHA.
If you’re interested in learning more about architecting solutions on AWS, check out popular reading - AWS for Solution Architects or The Self-Taught Cloud Computing Engineer
Before you start#
There are a few things this post assumes you already know (or atleast the basics-of).
A good starting point will be knowing what cloud computing / AWS is, creating an account & then understanding why you shouldn’t be clicking a single button on the AWS console.
You will, however, need to do this once as we need to store the terraform state file in a bucket - go ahead and create an empty S3 bucket on the AWS console which we will be using later on as our backend bucket.
GitHub Actions isn’t too complicated and will be used minimally - if you prefer any other form of CD that’s up to you.
Architecture#
A high level flow of what we want to be designing looks like this.
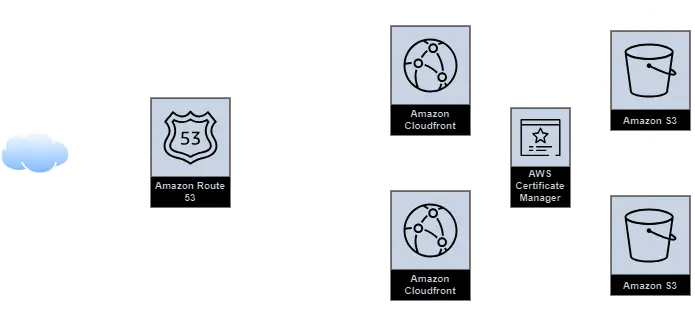
This architecture is mostly whatever you can find as AWS’ suggested way of hosting a static website, it would consist of:
- A DNS Service to route the incoming traffic to your domain
- A CDN to efficiently serve the data of your site with HTTPS enabled using a certificate
- A Storage Solution to put the static contents of your website
If you are wondering why we need 2 buckets, you can understand that from the mdn docs.
verbatim : It is good advice to do this [two domains] since you can't predict which URL users will type in their browser's URL bar.
You can choose to reverse the diagram and make the non-www domain as your canonical domain and your www domain redirect to it.
Initial terraform setup#
In the below
.tffiles, wherever you see text enclosed in<>, use your own values (without<>)
We need to specify the providers we are going to use - let’s do so with a providers.tf file.
terraform {
  required_version = "~> 1.8.3"

  required_providers {
    aws = {
      source  = "hashicorp/aws"
      version = "~> 5.0"
    }
  }

  backend "s3" {
    bucket = "<name of the bucket you created manually>"
    key    = "prod/terraform.tfstate"
    region = "us-east-1"
  }
}

provider "aws" {
  region = "us-east-1"
}

provider "aws" {
  alias  = "acm_provider"
  region = "us-east-1"
}The regions are kept separate for some flexibility with ACM & the rest of your infrastructure - ACM needs to be in us-east-1 to work with CloudFront, if you are trying to play around with different regions make sure to go through the documentation on AWS first
Going forward, I assume you already have a custom domain name, if not you can either set it up on AWS or any other domain registrars.
Some variables to be used across our infra will be specified in variables.tf
variable "domain_name" {
  type        = string
  description = "The domain name for the website."
}

variable "bucket_name" {
  type        = string
  description = "The name of the bucket without the www. prefix. Normally domain_name."
}

variable "common_tags" {
  description = "Common tags you want applied to all components."
}
with values in terraform.tfvars
domain_name = "<your-website.com>"
bucket_name = "<your-website.com>"

common_tags = {
  Project = "<any-tag-name>"
}S3#
We start off by making our S3 resources - 2 buckets, one for the canonical domain (www in my case) and one for redirecting the non-canonical domain to the canonical domain.
There are a few differences from what you will find in the AWS guide
- We have a CORS configuration for the canonical endpoint, which is because of a small issue with CloudFront - I put this as a precautionary measure to improve performance
- We have some configuration for an IAM policy - this is because I used the newer OAC method for authorizing CloudFront to access S3 instead of the legacy OAI .
Create s3.tf with the following content
# canonical s3
resource "aws_s3_bucket" "www_bucket" {
  bucket = "www.${var.bucket_name}"
  tags   = var.common_tags
}

resource "aws_s3_bucket_cors_configuration" "www_bucket" {
  bucket = aws_s3_bucket.www_bucket.id

  cors_rule {
    allowed_headers = ["*"]
    allowed_methods = ["GET", "HEAD"]
    allowed_origins = ["*"]
    expose_headers  = ["ETag"]
    max_age_seconds = 3000
  }
}

resource "aws_s3_bucket_policy" "www_bucket" {
  bucket = aws_s3_bucket.www_bucket.id
  policy = data.aws_iam_policy_document.oac_iam.json
}

data "aws_iam_policy_document" "oac_iam" {
  statement {
    actions = ["s3:GetObject"]

    resources = ["${aws_s3_bucket.www_bucket.arn}/*"]

    principals {
      type        = "Service"
      identifiers = ["cloudfront.amazonaws.com"]
    }
    condition {
      test     = "StringEquals"
      variable = "AWS:SourceArn"
      values   = [aws_cloudfront_distribution.www_s3_distribution.arn]
    }
  }
}

# non-canonical s3
resource "aws_s3_bucket" "root_bucket" {
  bucket = var.bucket_name
  tags = var.common_tags
}

resource "aws_s3_bucket_website_configuration" "root_bucket_configuration" {
  bucket = aws_s3_bucket.root_bucket.id
  redirect_all_requests_to {
    host_name = "www.${var.domain_name}"
    protocol = "https"
  }
}
ACM & CloudFront#
We next need to setup a CloudFront distribution for some basic DDoS protection & enabling HTTPS.
For enabling HTTPS, let’s first setup an SSL certificate to be used on CloudFront using ACM.
Create acm.tf with the following content
resource "aws_acm_certificate" "ssl_certificate" {
  provider                  = aws.acm_provider
  domain_name               = var.domain_name
  subject_alternative_names = ["*.${var.domain_name}"]
  validation_method         = "EMAIL"

  tags = var.common_tags

  lifecycle {
    create_before_destroy = true
  }
}

resource "aws_acm_certificate_validation" "cert_validation" {
  provider        = aws.acm_provider
  certificate_arn = aws_acm_certificate.ssl_certificate.arn
}When creating a certificate, AWS will send a confirmation email before the rest of your terraform script runs.
There’s a good chance that, like me, your domain registrar has enabled privacy protection for your domain - in which case if you are using EMAIL as your validation method, you would need to forward the registered contact email of your registrar to a personal email - check your whois to know where AWS will send confirmation email.
Next up, let’s create cloudfront.tf
There are a few differences from what you will find in the AWS guide
- We have an
aws_cloudfront_function, you can find thejscode for the function below. This is because of the way CloudFront’s root objects work which can be fixed in a variety of ways. I chose the one which was least-hackiest in my eyes, which is also one that AWS suggests. - We are not using OAI (legacy), instead we are using OAC.
- We have a
custom_error_responsefor handling 404s gracefully.
# cloudfront distribution for canonical domain
resource "aws_cloudfront_distribution" "www_s3_distribution" {
  origin {
    domain_name = aws_s3_bucket.www_bucket.bucket_regional_domain_name
    origin_id   = "S3-www.${var.bucket_name}"
    origin_access_control_id = aws_cloudfront_origin_access_control.oac.id
  }

  enabled             = true
  is_ipv6_enabled     = true
  default_root_object = "index.html"

  aliases = ["www.${var.domain_name}"]

  custom_error_response {
    error_caching_min_ttl = 0
    error_code            = 404
    response_code         = 200
    response_page_path    = "/404.html"
  }

  default_cache_behavior {
    allowed_methods  = ["GET", "HEAD"]
    cached_methods   = ["GET", "HEAD"]
    target_origin_id = "S3-www.${var.bucket_name}"

    forwarded_values {
      query_string = false

      cookies {
        forward = "none"
      }
    }

    viewer_protocol_policy = "redirect-to-https"
    min_ttl                = 31536000
    default_ttl            = 31536000
    max_ttl                = 31536000
    compress               = true

    function_association {
      event_type   = "viewer-request"
      function_arn = aws_cloudfront_function.redirect_subdir.arn
    }
  }

  restrictions {
    geo_restriction {
      restriction_type = "none"
    }
  }

  viewer_certificate {
    acm_certificate_arn      = aws_acm_certificate_validation.cert_validation.certificate_arn
    ssl_support_method       = "sni-only"
    minimum_protocol_version = "TLSv1.2_2021"
  }

  tags = var.common_tags
}

resource "aws_cloudfront_function" "redirect_subdir" {
  name    = "redirect-subdir-func"
  runtime = "cloudfront-js-2.0"
  comment = "Redirect Subdirectory"
  publish = true
  code    = file("${path.module}/functions/redirect-subdir.js")
}

resource "aws_cloudfront_origin_access_control" "oac" {
	name                              = "www_oac"
	description                       = "OAC for WWW endpoint for s3 blog"
	origin_access_control_origin_type = "s3"
	signing_behavior                  = "always"
	signing_protocol                  = "sigv4"
}

# cloudfront distribution for non-canonical domain
resource "aws_cloudfront_distribution" "root_s3_distribution" {
  origin {
    domain_name = aws_s3_bucket.root_bucket.website_endpoint
    origin_id   = "S3-.${var.bucket_name}"
    custom_origin_config {
      http_port              = 80
      https_port             = 443
      origin_protocol_policy = "http-only"
      origin_ssl_protocols   = ["TLSv1", "TLSv1.1", "TLSv1.2"]
    }
  }

  enabled         = true
  is_ipv6_enabled = true

  aliases = [var.domain_name]

  default_cache_behavior {
    allowed_methods  = ["GET", "HEAD"]
    cached_methods   = ["GET", "HEAD"]
    target_origin_id = "S3-.${var.bucket_name}"

    forwarded_values {
      query_string = true

      cookies {
        forward = "none"
      }

      headers = ["Origin"]
    }

    viewer_protocol_policy = "allow-all"
    min_ttl                = 0
    default_ttl            = 86400
    max_ttl                = 31536000
  }

  restrictions {
    geo_restriction {
      restriction_type = "none"
    }
  }

  viewer_certificate {
    acm_certificate_arn      = aws_acm_certificate_validation.cert_validation.certificate_arn
    ssl_support_method       = "sni-only"
    minimum_protocol_version = "TLSv1.2_2021"
  }

  tags = var.common_tags
}
The code for the function used above needs to reside in functions/redirect-subdir.js
function handler(event) {
    var request = event.request;
    var uri = request.uri;

    // Check whether the URI is missing a file name.
    if (uri.endsWith('/')) {
        request.uri += 'index.html';
    }
    // Check whether the URI is missing a file extension.
    else if (!uri.includes('.')) {
        request.uri += '/index.html';
    }

    return request;
}Route53#
Last but not the least, we need to get away from the ugly CloudFront URL and put our own custom domain there - let’s set this up with route53.tf
resource "aws_route53_zone" "main" {
  name = var.domain_name
  tags = var.common_tags
}

resource "aws_route53_record" "root-a" {
  zone_id = aws_route53_zone.main.zone_id
  name    = var.domain_name
  type    = "A"

  alias {
    name                   = aws_cloudfront_distribution.root_s3_distribution.domain_name
    zone_id                = aws_cloudfront_distribution.root_s3_distribution.hosted_zone_id
    evaluate_target_health = false
  }
}

resource "aws_route53_record" "www-a" {
  zone_id = aws_route53_zone.main.zone_id
  name    = "www.${var.domain_name}"
  type    = "A"

  alias {
    name                   = aws_cloudfront_distribution.www_s3_distribution.domain_name
    zone_id                = aws_cloudfront_distribution.www_s3_distribution.hosted_zone_id
    evaluate_target_health = false
  }
}
After your Route53 zone get’s created, we need to configure your domain settings to point to Route53’s nameservers. Based on where you have your domain registered, this step can vary - go through this for a starting point.
For applying changes, make an AWS IAM User with permissions for all the resources made here & set it up in your CLI
Once we have all of this in place, a quick little terraform init & terraform apply and a bit of patience should get you up an running. (don’t forget to approve your SSL certificate request!)
You can optionally automate this step - I found it to be overkill as I didn’t see myself changing the infrastructure a lot once I had it up and running. HashiCorp has some documentation to help you get started if you are using GHA.
Hosting your content#
Once your infrastructure is in place, you need to put your static website files in your S3 bucket, and this is probably something you will be changing frequently - so let’s automate it!
For my case, I had a Zola website & their documentation had an example pipeline for GHA. Your pipeline might vary based on how you created your static website. Apart from the build step below, everything should be the same.
name: Build and Publish to AWS S3
on:
  push:
    branches:
      - master

jobs:
  run:
    runs-on: ubuntu-latest
    timeout-minutes: 10
    steps:
      - uses: actions/checkout@v3
      - uses: taiki-e/install-action@v2
        with:
          tool: zola@0.17.2
      - name: Build
        run: zola build
      - uses: reggionick/s3-deploy@v4
        env:
          AWS_ACCESS_KEY_ID: ${{ secrets.AWS_ACCESS_KEY_ID }}
          AWS_SECRET_ACCESS_KEY: ${{ secrets.AWS_SECRET_ACCESS_KEY }}
          AWS_DEFAULT_REGION: us-east-1
        with:
          folder: public
          bucket: <canonical-bucket-name>
          private: true
          bucket-region: us-east-1
          dist-id: ${{ secrets.CLOUDFRONT_DISTRIBUTION_ID }}
          invalidation: /*
With that you should be able to access your website in HTTPS on your canonical domain.
Till the next blog, adieu.